
Star Trek: Discovery
Thursdays on Paramount+Star Trek: Discovery Season 1 Episode 12
Vaulting Ambition
Recap
Aboard a shuttle heading to the Imperial flagship, the I.S.S. Charon, Burnham and Lorca discuss the data Saru was able to decrypt about the U.S.S. Defiant. Burnham administers an analgesic to Lorca to numb the pain receptors in anticipation of more agonizers and Lorca reminds her that all the information they need will be held in the palace, which is the Charon.
On board the Discovery, Tilly and Saru discuss Stamets' condition. He is still unconscious but neural activity and other body functions have increased. Sick bay pages Saru for a medical emergency and Saru leaves Tilly with an order to "fix him," reminding her that if Lorca and Burnham cannot uncover the Defiant's coordinates, the spore drive is the only way home.
Inside Stamets' head, he wanders the mycelial forest with his Mirror-self. Mirror-Stamets displays a goofy sense of humor. Mirror-Stamets walks him through the surroundings (which look like the Discovery), explaining his Mirror existence. He didn't conduct his mycelial research on the Discovery. Instead, he was conducting his experiments on the Charon when there was an accident and he ended up in a coma himself. He'd tracked Prime-Stamets' spore navigation and tried to reach out and make contact, flashing Prime-Stamets glimpses of his universe which Prime-Stamets had thought signs of madness. When the surroundings glitch, Mirror-Stamets informs Prime-Stamets that there's a corruption in the network that is extremely dangerous to get swept up in. When Prime-Stamets tries to reach Engineering, the corruption flashes him the message that "the enemy is here" and they have to run to avoid the wave of corruption. They reach Engineering where Prime-Stamets believes he'll find a way out for them. Mirror-Stamets looks skeptical.
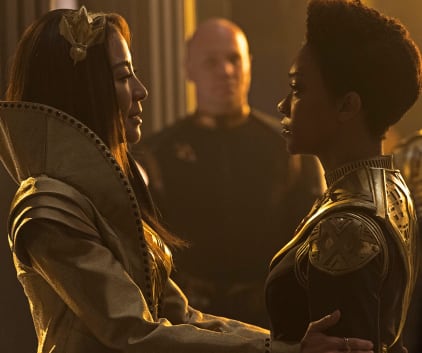
Aboard the I.S.S. Charon, Burnham brings Lorca into the Emperor's throne room. The Emperor offers Burnham the choice of three Kelpians. Burnham chooses one and he is led away. Burnham presents Lorca as a gift to the Emperor and when Lorca refuses to bow, she stabs him and beats him down and condemns him to the agonizers. He is taken down to the brig and the Emperor welcomes Burnham back with genuine warmth and affection. She orders Burnham to join her for dinner.
In sick bay on the Discovery, Tyler is unsedatable and has caused much damage to the equipment while thrashing and yelling in Klingon. When Saru approaches, he suddenly becomes calm and asks him about Burnham and then asks for help before the Voq madness takes over again.
Lorca is placed in an agonizer on the Charon while Burnham sits down to a dinner with Georgiou made from the Kelpian she'd selected in the throne room. After eating a bit, Georgiou questions Burnham's absence from her side and then reveals that she knows that Burnham and Lorca had conspired together to take her throne. She orders her guards to take Burnham to the throne room where she intends to execute her.
The two Stamets are looking for a way out but Prime-Stamets discovers that the coordinates of the last jump aren't in the computer. Mirror-Stamets keeps scratching at his arm and reveals that he's been infected with a fungus from being in the network too long. Just then, Prime-Stamets hears his name called and catches a glimpse of Culber. He chases after Culber despite Mirror-Stamets' protests that he needs to focus on the job at hand.
The Emperor is about to execute Burnham before many witnesses in the throne room when Burnham explains that she is from another universe and that she is not the Burnham Emperor Georgiou knows. She gives her Prime-Georgiou's com badge as proof. The Emperor tests it and confirms what Burnham stated and then immediately kills all but one of the witnesses in the throne room.
On the Discovery, Saru delivers food to L'Rell's cell and tells her that Tyler thinks he is a Klingon. L'Rell explains that he is Klingon and how he has given everything to win the Klingon conflict. In turn, Saru explains that they are now in an alternate dimension and here, the Klingons lost and the conflict is over. He asks for her help to ease Voq/Tyler's suffering. She responds that Voq chose this path and his suffering is part of what he chose.
In Stamets' head, he chases after Culber through dark Discovery corridors. A door opens and he enters their quarters but it seems empty. He tries to leave but the door closes and Culber appears. Stamets asks if he's caught in the mycelial network as well and Culber has to break the news that he's dead.
Burnham tries to convince the Emperor to give her the information on the Defiant so that her ship can return to their universe. The Emperor tells her that interphasic space travel drove every member of the Defiant's crew mad and wonders why the same thing didn't happen to her ship and crew. Burnham tells her they came a different way and this perks the Emperor's curiosity as to what powers the Discovery that could send it across dimensions. Burnham tells her it travels using a spore drive and the Emperor demands the engine schematics in exchange for the Discovery's freedom.
Saru shows L'Rell the damage Voq/Tyler has done to himself when he managed to break free of his restraints. When L'Rell again refuses to help him, Saru orders Voq/Tyler to be transported into her cell. As he walks away from the cell, L'Rell cries out that the procedure can be undone but she must do it herself.
Lorca is visited in the brig by the Charon's captain, Maddox. Apparently, he has a personal grudge because of something Lorca did to his sister. He holds up a vial of some alien DNA that doesn't mix well with human as a threat. Another prisoner is brought in who recognizes Lorca and he amazed that he is alive. Maddox smashes his face into the floor and demands that Lorca say his sister's name or he will inject the prisoner with the DNA. Lorca tries to talk him down and the prisoner is injected and disintegrates in agony.
In the Discovery's sick bay, L'Rell is performing the procedure on Voq/Tyler while several security officers hold drawn weapons on her. While she operates, she and Voq/Tyler converse in Klingon. As the procedure ends, Voq/Tyler only speaks in English.
Prime-Stamets and Culber discuss Culber's murder. Stamets remembers seeing Tyler kill Culber and Culber remembers Stamets' arms around his corpse. Culber tells him that Mirror-Stamets exploited the network and was the one that caused the corruption that is infecting everyone, including himself. He encourages Stamets to save the network in order to save Discovery. He gives him directions to help him wake up from the coma.
Mirror-Stamets wakes up from his coma and rejoins his crew on the I.S.S. Charon. Prime-Stamets opens his eyes on the Discovery and insists that TIlly come with him to Engineering's mycelial forest where they find the forest withered and sick.
Burnham send the flagship's coordinates to Saru to bring the Discovery to despite Saru's misgivings. The Emperor talks with Burnham about her Mirror-self's relationship with Mirror-Lorca who began as a father-figure and became more. As the Emperor describes Mirror-Lorca and his personality, Burnham suddenly realizes that Lorca has been using her to get onto the Charon. Down in the brig, it looks like Lorca's been killed by the agonizer but when Maddox goes to resuscitate him, it turns out he was faking and turns the defibrillator paddles back on him. Burnham realizes Lorca has been Mirror-Lorca all along as he tells the captain his sister's name was Ava and then kills him.
- Show:
- Star Trek: Discovery
- Season:
- Star Trek: Discovery Season 1
- Episode Number:
- 12


